Stepping into the vast, ancient grounds of Angkor Wat for the first time is an experience that truly transcends words. I’ll never forget the feeling of awe as I first laid eyes on those iconic spires, the intricate carvings whispering tales of centuries past.
It’s a photographer’s dream, a monumental canvas waiting to be captured, but also a formidable challenge. You know that moment when you’re there, trying to frame the perfect shot, battling the relentless crowds, the ever-changing light, or simply feeling overwhelmed by the sheer scale of it all?
It’s easy to come away with snapshots that just don’t convey the magic you felt. With the rise of social media and the sheer volume of visitors, getting unique, impactful photos while still being respectful of this sacred site and fellow travelers has become an even bigger puzzle.
It’s not just about having the latest camera gear anymore; it’s about understanding the nuances of the environment, respecting local culture, and employing smart techniques.
I’ve personally spent hours navigating these challenges, learning through trial and error what truly works to elevate a simple picture into a memorable piece of art.
Let’s dive into the details below to ensure your Angkor Wat photographs are nothing short of spectacular.
Mastering the Light: Chasing Angkor’s Golden Hues

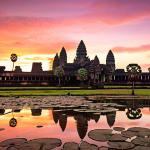
There’s this almost mystical quality to the light in Angkor, especially as the sun kisses the ancient stones at dawn or dips below the horizon at dusk. I’ve woken up countless times before the sun, trudging through the pre-dawn darkness towards Angkor Wat’s west gate, jostling for a spot by the lily ponds. It’s a moment of collective breath-holding as the first rays hit the iconic spires, painting them in shades of orange and pink. This isn’t just about pretty colors; it’s about the way the low angle light carves out the intricate bas-reliefs, adding depth and drama that mid-day sun simply washes away. My biggest lesson here was patience, and learning to read the sky, because every sunrise, every sunset, is a unique show. You might plan the perfect shot, but a surprise cloud or a sudden mist can completely change the scene, and that’s part of the raw beauty of it all. I’ve learned to embrace the unexpected moments that nature throws at you.
1. Early Bird Gets the Best Shot (and Spot)
The cardinal rule for sunrise at Angkor Wat is simple: arrive early. And when I say early, I mean arriving before the ticket counters even open sometimes, if you want a prime spot. I’ve seen people set up tripods an hour before the first hint of light just to secure their place by the reflections ponds. This isn’t just for the main temple; it applies to temples like Srei Srei or Preah Khan where the morning light filters through the trees, creating ethereal beams. I distinctly remember one morning at Ta Prohm, arriving just as the first light touched the giant banyan roots, and for a fleeting 20 minutes, I had the place almost entirely to myself, capturing shots that felt truly intimate and unhurried.
2. Chasing the Golden and Blue Hours
Beyond sunrise, the golden hour just after dawn and before sunset offers incredible opportunities. The light is soft, warm, and creates long, dramatic shadows that highlight the textures of the stone. Conversely, the blue hour, just before sunrise and immediately after sunset, wraps the temples in a cool, contemplative glow. I’ve found some of my most atmospheric shots during these times, especially when the temple lights start to come on, offering a beautiful contrast. It’s about being prepared to stay past sunset, or arrive while it’s still dark, to capture these elusive, magical moments.
Navigating the Crowds: Strategic Composition & Timing
Let’s be real, Angkor Wat is *popular*. Battling the sheer volume of visitors, especially at prime locations like the west gate of Angkor Wat or the Bayon faces, can feel like a contact sport. My first visit, I felt utterly defeated trying to get a clear shot. But through trial and error, I learned that it’s not about avoiding people entirely—that’s nearly impossible—but rather about smart navigation and creative composition. It often means taking a deep breath, looking for unique angles, or simply waiting for that one brief window when a tour group moves on. I’ve personally spent what felt like an eternity waiting for a specific frame to clear, and the satisfaction of finally getting the shot without a sea of heads was immensely rewarding. It forces you to think outside the box and truly see the architecture beyond the human element.
1. Strategic Positioning and Patience
Sometimes, the best solution isn’t to fight the crowds, but to find a slightly elevated vantage point or a less obvious corner. At Angkor Wat, instead of the main pond, try moving further along the causeway for a different perspective, or find a spot slightly off-center. At Bayon, I discovered that by patiently waiting for a lull, or by focusing on the upper tiers, I could isolate those incredible smiling faces without dozens of tourists in the frame. It’s about being mindful and seizing those fleeting opportunities. I’ve learned to become a master of the “wait and shoot” technique, often finding unexpected beauty in the negative space created by a temporary gap in the foot traffic.
2. Wide-Angle Wonders vs. Detail Shots
A wide-angle lens is your best friend for capturing the immense scale of the temples, and it also helps minimize the visual impact of crowds by including more of the impressive structure. However, don’t forget your telephoto lens for those tight, intimate detail shots of the carvings or a solitary monk. I found that switching between lenses, or having two camera bodies, allowed me to quickly adapt to the dynamic environment. Focusing on an intricate Apsara carving or a weathered stone gargoyle can produce incredibly powerful images that tell a story, even when the broader scene is bustling with people.
Essential Gear for the Cambodian Climate
Packing for Angkor isn’t just about camera bodies and lenses; it’s about preparing for the tropical climate and the demands of extensive temple exploration. I learned this the hard way on my first trip when my camera lens fogged up in the humidity, and I hadn’t brought enough water. You need to be ready for heat, humidity, dust, and sudden downpours. I always recommend a good camera bag that offers quick access but also protection from the elements. Don’t underestimate the small things that can make or break your photography experience.
1. Camera Bodies and Lenses: What Really Matters
While a full-frame DSLR or mirrorless camera will give you the best image quality, honestly, even a good smartphone with a wide-angle attachment can capture stunning photos if you know how to compose. My personal go-to setup usually includes a wide-angle zoom (e.g., 16-35mm) for grand landscapes and interiors, and a versatile standard zoom (e.g., 24-70mm) for general shots and portraits. A telephoto lens (e.g., 70-200mm) is fantastic for isolating details or capturing distant temple spires. Consider bringing a sturdy tripod for low-light shots, but be mindful of crowds. And extra batteries? Absolutely crucial. You’ll be shooting all day, often without easy access to charging points.
2. Beyond the Camera Bag: Practical Essentials
Here’s a quick rundown of what I always pack in my day bag for a full day of temple hopping. Trust me, these items are just as important as your lenses for a successful shoot and a comfortable experience.
| Category | Item | Why It’s Essential for Angkor |
|---|---|---|
| Photography Accessories | Extra Batteries & Power Bank | Long days of shooting in varying temperatures drain batteries fast. |
| Photography Accessories | Microfiber Cleaning Cloths | Humidity, dust, and sweat are your enemies; keep lenses spotless. |
| Photography Accessories | Rain Cover for Camera/Bag | Tropical downpours can appear without warning. |
| Personal Comfort | Plenty of Drinking Water | Dehydration is a serious risk in the Cambodian heat. |
| Personal Comfort | Sunscreen & Hat | Protection from the intense equatorial sun. |
| Personal Comfort | Insect Repellent | Mosquitoes are present, especially around dawn/dusk. |
| Other | Comfortable Walking Shoes | You’ll be walking *a lot* on uneven surfaces. |
| Other | Lightweight Scarf/Sarong | Useful for sun protection, dust, or covering up for temple visits. |
Beyond the Main Temple: Uncovering Hidden Gems
While Angkor Wat is undeniably the crown jewel, limiting yourself to just the main temple would be a huge disservice to the vastness and diversity of the Angkor Archaeological Park. I remember feeling a bit overwhelmed by the sheer scale of the park on my first visit, but once I ventured out, I discovered so many unique architectural styles, serene corners, and incredible photographic opportunities. Each temple has its own distinct personality, and some of my most cherished photographs are from these less-traveled spots, where the atmosphere feels more contemplative and the crowds are noticeably thinner. Don’t be afraid to add extra days to your itinerary just to explore these other wonders; it’s truly worth the time and effort.
1. The Allure of Angkor Thom’s Bayon
Just a short drive from Angkor Wat lies the ancient city of Angkor Thom, home to the enigmatic Bayon temple. With its hundreds of serene, smiling faces carved into towering spires, it feels like stepping into a different world entirely. The atmosphere here is thick with history, and the way the light plays on those giant faces throughout the day is endlessly fascinating. I spent hours here, getting lost in its labyrinthine corridors, constantly finding new angles and expressions. It’s a completely different photographic challenge from Angkor Wat, focusing more on intimate portraiture of stone and the play of light and shadow.
2. Ta Prohm: Nature Reclaiming History
You probably know Ta Prohm as the “Tomb Raider temple,” and for good reason. It’s an extraordinary sight where massive tree roots have entwined themselves with ancient stone walls, creating a breathtaking and somewhat surreal landscape. It’s a powerful reminder of nature’s relentless embrace. My advice for Ta Prohm is to arrive early, before the tour buses descend, to truly soak in the atmosphere. The light filtering through the canopy, illuminating the colossal roots, makes for incredibly dramatic photographs. It’s chaotic, beautiful, and a photographer’s dream for capturing the delicate balance between man-made and natural artistry.
Respecting the Sacred: Ethical Photography at Angkor
This is probably the most important point I can make: Angkor is not just a tourist attraction; it’s a living, breathing sacred site for many Cambodians. When you’re there, you’re a guest in their spiritual home. My personal approach to photography here has always been rooted in deep respect for the culture, the people, and the temples themselves. This isn’t just about following rules; it’s about being mindful and empathetic. I’ve seen some tourists behave in ways that were frankly disrespectful, and it always made me cringe. Being a responsible photographer enhances your experience and ensures that these magnificent sites can be enjoyed by generations to come.
1. Dress Code and Temple Etiquette
This one is simple but often overlooked. Temples require modest dress: shoulders and knees must be covered. I always carry a lightweight scarf or sarong for myself and anyone I’m traveling with, just in case. Beyond clothing, remember that these are places of worship. Be quiet, walk reverently, and avoid climbing on fragile structures. There are signs everywhere, and it’s really about common sense and respect for the place and the people who come to pray there. I always made sure to observe what local visitors were doing and follow their lead.
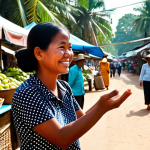
2. Photography of Monks and Locals: A Sensitive Approach
You’ll often see monks and local Cambodians within the temple grounds. While they make for incredible subjects, always, always ask for permission before taking their photograph. A simple gesture, a smile, or learning a few basic Khmer phrases like “Sok Sdey” (hello) and “Aw Khun” (thank you) can go a long way. If they say no, respect their decision. And never, ever offer money for a photo; it can turn a genuine interaction into a transactional one. I’ve had some truly heartwarming interactions with monks and children by just being friendly and respectful, and those photos are far more meaningful than any I could have sneaked.
Bringing Your Images to Life: Post-Processing Tips
Getting the shot in-camera is only half the battle, especially in a challenging environment like Angkor. The dust, the haze, the sometimes flat mid-day light – it all means that a good post-processing workflow can truly elevate your images from snapshots to works of art. I used to be intimidated by editing, but over time, I’ve realized it’s where you infuse your emotional memory of the place back into the photograph. It’s not about making things look fake; it’s about bringing out the magic you felt when you pressed the shutter button. I personally prefer a more natural, subtle edit that enhances the existing beauty rather than creates something entirely new.
1. Enhancing the Mood: Color Grading and Contrast
When I review my Angkor photos, I often find that the vibrant greens of the jungle and the warm tones of the stone need a little boost. A slight adjustment to color temperature to bring out the warmth, or a subtle increase in contrast, can make a huge difference. I often use split toning to add warm highlights and cool shadows, which really enhances the ancient, mystical feel of the temples. Don’t be afraid to play with clarity and texture sliders to bring out the intricate details of the carvings that might otherwise get lost in the haze. It’s all about making the image resonate with the feeling you had standing there.
2. Dealing with Dust and Haze
This is a common challenge in the dry season. Dust particles can soften images and reduce clarity. In post-processing, I frequently use the dehaze slider in Lightroom or similar tools to cut through the atmospheric haze. I also use the spot removal tool to carefully clean up any dust spots on my sensor or lens that might have snuck in despite my best efforts. It’s tedious, but it makes a significant difference to the final image quality. I’ve learned that a clean sensor and clean lens are paramount, but editing can save a shot if a few rogue dust motes appear.
My Personal Takeaways: Lessons from the Temples
Reflecting on my many journeys to Angkor, the biggest lesson I’ve learned isn’t about specific camera settings or trendy compositions. It’s about presence and connection. The temples of Angkor, with their silent grandeur, teach you patience, humility, and a profound appreciation for history and human endeavor. I came away not just with thousands of photographs, but with a deeply personal experience that changed the way I approach travel photography. It’s less about getting the “perfect” shot that everyone else has, and more about capturing your own unique perspective, the moments that resonate with *you*. I’ve found that the best photos are often the ones that tell a story, evoke an emotion, and make you remember exactly how you felt in that sacred space.
1. The Unseen Challenges I Faced
Beyond the obvious heat and crowds, I encountered unexpected challenges. There was the time my favorite lens decided to act up in the middle of a shoot at Preah Khan, forcing me to adapt with a different focal length than planned. Or the occasional overwhelming feeling of being just one tiny person amidst centuries of history, making it hard to frame an image that truly conveyed the scale. These moments of frustration, surprisingly, often led to creative breakthroughs, forcing me to think differently and look for beauty in unconventional ways. It’s about being resilient and making the most of every situation, even when it’s less than ideal.
2. Moments That Still Resonate
Some memories are just etched into my mind, even more vividly than the photographs themselves. Like the soft chanting of monks echoing through the stone corridors at Angkor Wat just after sunrise, or the feeling of sheer wonder staring up at the giant tree roots at Ta Prohm, listening to the jungle come alive around me. These are the feelings I try to capture in my photos, the intangible elements that make Angkor so special. It’s not just about what you see, but what you *feel* and what you *experience* in those hallowed grounds.
Closing Thoughts
As I wrap up this journey through the lens of Angkor, I hope you’ve caught a glimpse of the profound beauty and rich history that awaits. Photographing these ancient temples isn’t just about capturing stunning images; it’s about connecting with a place that hums with centuries of stories. Every sunrise, every shadow, every intricate carving offers a fresh opportunity to see the world, and yourself, in a new light. So, pack your bags, charge your batteries, and prepare for an unforgettable adventure. Angkor truly leaves an indelible mark on your soul.
Useful Information
1. Visa Requirements: Most nationalities require a visa to enter Cambodia. You can usually obtain one on arrival at international airports, or apply for an e-Visa online in advance. Always check the latest requirements for your specific nationality.
2. Best Time to Visit: The cool and dry season (November to February) is generally considered the best time for photography and exploration, with lower humidity and pleasant temperatures. However, it’s also the busiest. The rainy season (May to October) offers lush greenery and fewer crowds, though sudden downpours are common.
3. Getting Around Angkor: The most common way to explore the park is by hiring a tuk-tuk driver for the day, which offers flexibility and a local experience. Alternatively, you can hire a car with a driver, or for the more adventurous, rent a bicycle, though the distances between temples can be significant.
4. Angkor Pass: You’ll need an Angkor Pass to enter the temples. These are sold as 1-day, 3-day, or 7-day passes. Purchase them at the official Angkor Enterprise ticket office located a few kilometers from Siem Reap town. Your photo will be taken on the spot for the pass.
5. Accommodation in Siem Reap: Siem Reap serves as the gateway to Angkor and offers a wide range of accommodation, from budget guesthouses to luxury resorts. Staying relatively close to the town center makes it convenient for early morning departures to the temples and evening activities.
Key Takeaways
To truly master photography at Angkor, remember these pillars: preparation is key, from understanding the light to packing the right gear; respect the sacredness of the sites and local customs; patience is paramount, especially when navigating crowds; and finally, embrace your unique perspective. It’s about more than just technical skill; it’s about allowing the ancient wonder of Angkor to inspire your artistic and personal journey, yielding not just photographs, but profound memories.
Frequently Asked Questions (FAQ) 📖
Q: Given the massive scale and crowds at
A: ngkor Wat, what’s your personal secret to capturing those truly unique, impactful shots that don’t look like everyone else’s vacation photos? A1: Oh, this is the million-dollar question, isn’t it?
It boils down to patience, persistence, and a willingness to explore beyond the obvious viewpoints. My “secret” isn’t really a secret, but a hard-earned lesson: get there early.
I mean, pre-dawn early, when the air is cool and thick with anticipation. The sunrise over Angkor Wat is cliché for a reason, but it’s also your golden hour to capture that iconic silhouette without a thousand heads in your frame.
Beyond that, I learned to look away from the main temple. Seriously. Wander through the smaller courtyards, find a quiet archway framing a distant spire, or focus on the intricate carvings that tell a story in themselves.
It’s about finding those intimate details or unusual perspectives. I also found that a simple telephoto lens can be a game-changer – it lets you compress the scene, isolate specific elements, and cut out the noise of the crowds, making it feel far more personal and dramatic.
Sometimes, the best shot is the one you waited 20 minutes for, watching the light shift, or the one you found by turning 180 degrees from where everyone else was pointing their cameras.
Q: Angkor Wat is such a sacred and historically significant site. How do you balance the desire to get amazing photos with the crucial need to be respectful of the local culture, the site itself, and other visitors?
A: This is absolutely paramount, and honestly, it’s something I spend more time thinking about than f-stops or shutter speeds. My approach is always ‘respect first, photo second.’ Firstly, dress modestly – knees and shoulders covered, always.
It’s a sign of respect for a sacred place, and it also prevents any awkward stares or even being denied entry to certain areas. When I see monks, I always keep a respectful distance, and if I want a photo, I’ll discreetly ask for permission with a gesture or a quiet “sumpeah” (the traditional Cambodian greeting).
Never interrupt a prayer or a ceremony. It’s not just about what you can do, but what you shouldn’t do. Avoid using flash indoors where it can damage ancient frescoes, and definitely no climbing on the ancient structures for a better angle – it’s just plain disrespectful and prohibited.
Also, just be mindful of your fellow visitors. Nobody wants a selfie stick whacked into their face or their peaceful moment disturbed by someone shouting directions for a photo op.
A little patience, a quiet demeanor, and remembering you’re a guest in their spiritual home go a long, long way.
Q: Beyond just the perfect moment, what practical tips do you have for getting those “wow”
A: ngkor Wat photos, especially when you’re dealing with challenging light or the sheer exhaustion of exploring such a vast complex? A3: Oh, the exhaustion is real, isn’t it?
You’re trekking for miles, sweat dripping, but still chasing that perfect light! My biggest practical tip, especially for those challenging midday hours when the light is harsh, is to leverage contrast and shadows.
Instead of fighting the bright sun, look for areas where shadows create dramatic patterns, or use the strong light to highlight textures in the stone carvings.
That high sun can actually create some really striking, almost graphic, images if you compose them correctly. Also, consider “golden hour” for the afternoon – the light gets soft and warm, casting long shadows that really bring out the depth in the reliefs.
For exhaustion, honestly, hydrate like crazy and take breaks. Find a shady spot, sit down, and just observe for a while. Sometimes the best photos aren’t planned; they emerge from simply being present and noticing something unique – a local vendor setting up, a detail on a wall you hadn’t seen before, or a quiet moment of reflection from another traveler.
And don’t forget the details! A tight shot of a single Apsara carving, or the texture of the moss on the ancient stones, can be incredibly powerful and often easier to capture with impact than sweeping wide shots, especially if you’re feeling tired.
📚 References
Wikipedia Encyclopedia
구글 검색 결과
구글 검색 결과
구글 검색 결과
구글 검색 결과
구글 검색 결과